1.13. Inheritance in C++
In this section we introduce another important aspect of object-oriented programming. Inheritance is the ability for one class to be related to another class in much the same way that people can be related to one another. Children inherit characteristics from their parents. Similarly, C++ child classes can inherit characteristic data and/or behaviors from a parent class. The child classes are often referred to as subclasses or derived classes, and the parent class is often called the base class or superclass.
Figure 8 shows the built-in C++ collections and their
relationships to one another. We call a relationship structure such as
this an inheritance hierarchy. For example, the string is a child of
the sequential collection. In this case, we call the string the child and
the sequence the parent (or subclass string and superclass sequence). This
is often referred to as an IS-A Relationship (the string IS-A
sequential collection). This implies that strings inherit important
characteristics from sequences, namely the ordering of the underlying
data and operations such as concatenation, repetition, and indexing.
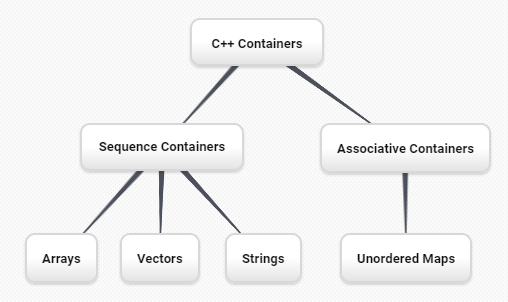
Figure 8: An Inheritance Hierarchy for C++ Collections
Vectors, arrays, and strings are all types of sequential collections. They all inherit common data organization and operations. However, each of them is distinct as well. The children all gain from their parents but distinguish themselves by adding additional characteristics.
By organizing classes in this hierarchical fashion, object-oriented programming languages allow previously written code to be extended to meet the needs of a new situation. In addition, by organizing data in this hierarchical manner, we can better understand the relationships that exist. We can be more efficient in building our abstract representations.
A child class inherits both behaviors and properties
from the parent subject to some access restrictions.
These variables and functions become members of the derived class.
A virtual function is a member function which is declared within a base class
and is overwritten by a derived class. In C++, the keyword
virtual is used.
A simple example of using a virtual function in C++ is shown below.
In this example, the two derived subclasses inherit the printType
method from the Base class.
1.13.1. Logic Gates and Circuits
To explore this idea further, we will construct a simulation, an application to simulate digital circuits. The basic building block for this simulation will be the logic gate. These electronic switches represent Boolean algebra relationships between their input and their output. In general, gates have a single output line. The value of the output is dependent on the values given on the input lines.
AND gates have two input lines, each of which can be either 0 or 1,
representing false or true, respectively. If both of the input
lines have the value 1, the resulting output is 1. However, if either or
both of the input lines is 0, the result is 0. OR gates also have two
input lines and produce a 1 if one or both of the input values is a 1.
In the case where both input lines are 0, the result is 0.
NOT gates differ from the other two gates in that they only have a single input line. The output value is simply the opposite of the input value. If 0 appears on the input, 1 is produced on the output. Similarly, 1 produces 0. Figure 9 shows how each of these gates is typically represented. Each gate also has a truth table of values showing the input-to-output mapping that is performed by the gate.
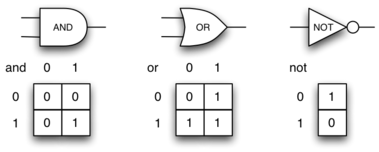
Figure 9: Three Types of Logic Gates
By combining these gates in various patterns and then applying a set of input values, we can build circuits that have logical functions. Figure 10 shows a circuit consisting of two AND gates, one OR gate, and a NOT gate. The output lines from the two AND gates feed directly into the OR gate, and the resulting output from the OR gate is given to the NOT gate. If we apply a set of input values to the four input lines (two inputs for each AND gate), the values are processed and a result appears at the output of the NOT gate. Figure 10 also shows an example with values.
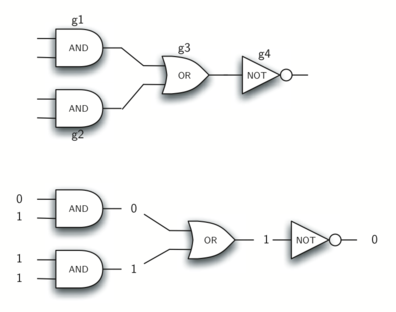
Figure 10: Circuit
In order to implement a circuit, we will first build a representation
for logic gates. Logic gates are easily organized into a class
inheritance hierarchy as shown in Figure 11. At the top of the
hierarchy, the LogicGate class represents the most general
characteristics of logic gates: namely, a label for the gate and an
output line. The next level of subclasses breaks the logic gates into
two families, those that have one input line and those that have two.
Below that, the specific logic functions of each appear.
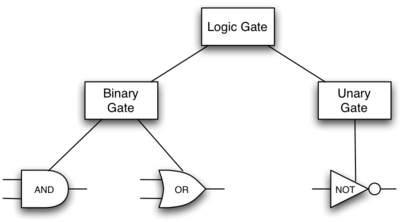
Figure 11: An Inheritance Hierarchy for Logic Gates
We can now start to implement the classes by starting with the most
general, LogicGate. As noted earlier, each gate has a label for
identification and a single output line. In addition, we need methods to
allow a user of a gate to ask the gate for its label.
The other behavior that every logic gate needs is the ability to know its output value. This will require that the gate perform the appropriate logic based on the current input. In order to produce output, the gate needs to know specifically what that logic is. This means calling a method to perform the logic computation. The complete class is shown in Listing 8.
Listing 8
class LogicGate {
    public:
            LogicGate(string n) {
                    label = n;
            }
            string getLabel() {
                    return label;
            }
            bool getOutput() {
                    output = performGateLogic();
                    return output;
        }
    protected:
        string label;
        bool output;
};
A protected member variable or function is similar to a
private member but it has the additional benefit that they
can be accessed by derived classes. The access keyword
protected is used for this.
At this point, we will not implement the performGateLogic function.
The reason for this is that we do not know how each gate will perform
its own logic operation. Those details will be included by each
individual gate that is added to the hierarchy. This is a very powerful
idea in object-oriented programming. We are writing a method that will
use code that does not exist yet. The parameter virtual is a reference
to the actual gate object invoking the method. Any new logic gate that
gets added to the hierarchy will simply need to implement the
performGateLogic function and it will be used at the appropriate
time. Once done, the gate can provide its output value. This ability to
extend a hierarchy that currently exists and provide the specific
functions that the hierarchy needs to use the new class is extremely
important for reusing existing code.
We categorized the logic gates based on the number of input lines. The
AND gate has two input lines. The OR gate also has two input lines. NOT
gates have one input line. The BinaryGate class will be a subclass
of LogicGate and will add two input lines. The UnaryGate class
will also subclass LogicGate but will have only a single input line.
In computer circuit design, these lines are sometimes called “pins” so
we will use that terminology in our implementation.
Listing 9
class BinaryGate : public LogicGate {
    public:
        BinaryGate(string n) : LogicGate(n) {
            pinATaken = false;
            pinBTaken = false;
        }

        bool getPinA() {
            if (pinATaken==false) {
                cout << "Enter Pin input for gate " << getLabel() << " : ";
                cin >> pinA;
                pinATaken = true;
            }
            return pinA;
        }

        bool getPinB() {
            if (pinBTaken==false ) {
                cout << "Enter Pin input for gate " << getLabel() << " : ";
                cin >> pinB;
                pinBTaken = true;
            }
            return pinB;
        }
        protected:
            bool pinA;
            bool pinATaken;
            bool pinB;
            bool pinBTaken;
};
Listing 10
class UnaryGate : public LogicGate {
    public:
        UnaryGate(string n) : LogicGate(n) {
            pinTaken = false;
        }
        bool getPin() {
            if (pinTaken==false) {
                cout << "Enter Pin input for gate " << getLabel() << ": ";
                cin >> pin;
                pinTaken = true;
            }
            return pin;
        }
    protected:
        bool pin;
        bool pinTaken;
};
Listing 9 and Listing 10 implement these two
classes. The constructors in both of these classes start with an
explicit call to the constructor of the parent class using the parent’s name
method. When creating an instance of the BinaryGate class, we
first want to initialize any data items that are inherited from
LogicGate. In this case, that means the label for the gate. The
constructor then goes on to add the two input lines (pinA and
pinB). This is a very common pattern that you should always use when
building class hierarchies. Child class constructors need to call parent
class constructors and then move on to their own distinguishing data.
The only behavior that the BinaryGate class adds is the ability to
get the values from the two input lines. Since these values come from
some external place, we will simply ask the user via an input statement
to provide them. The same implementation occurs for the UnaryGate
class except that there is only one input line.
Now that we have a general class for gates depending on the number of
input lines, we can build specific gates that have unique behavior. For
example, the AndGate class will be a subclass of BinaryGate
since AND gates have two input lines. As before, the first line of the
constructor calls upon the parent class constructor (BinaryGate),
which in turn calls its parent class constructor (LogicGate). Note
that the AndGate class does not provide any new data since it
inherits two input lines, one output line, and a label.
Listing 11
class AndGate : public BinaryGate {
    public:
        AndGate(string n) : BinaryGate(n) {};

        virtual bool performGateLogic() {
            bool a = getPinA();
            bool b = getPinB();
            if (a == 1 && b == 1) {
                return true;
            }
            else {
                return false;
            }
        }
};
The only thing AndGate needs to add is the specific behavior that
performs the Boolean operation that was described earlier. This is the
place where we can provide the performGateLogic method. For an AND
gate, this method first must get the two input values and then only
return 1 if both input values are 1. The complete class is shown in
Listing 11.
We can show the AndGate class in action by creating an instance and
asking it to compute its output. The following session shows an
AndGate object, gand1, that has an internal label "gand1". When we
invoke the getOutput method, the object must first call its
performGateLogic method which in turn queries the two input lines.
Once the values are provided, the correct output is shown.
>>> AndGate gand1("gand1")
>>> gand1.getOutput()
Enter Pin A input for gate gand1: 1
Enter Pin B input for gate gand1: 0
0
The same development can be done for OR gates and NOT gates. The
OrGate class will also be a subclass of BinaryGate and the
NotGate class will extend the UnaryGate class. Both of these
classes will need to provide their own performGateLogic functions,
as this is their specific behavior.
We can use a single gate by first constructing an instance of one of the gate classes and then asking the gate for its output (which will in turn need inputs to be provided). For example:
>>> OrGate gand2("gand2")
>>> gand2.getOutput()
Enter Pin A input for gate gand2: 1
Enter Pin B input for gate gand2: 1
1
>>> gand2.getOutput()
Enter Pin A input for gate gand2: 0
Enter Pin B input for gate gand2: 0
0
>>> NotGate gor2("gor2")
>>> gor2.getOutput()
Enter Pin input for gate gor2: 0
1
1.13.2. Building Circuits
Now that we have the basic gates working, we can turn our attention to
building circuits. In order to create a circuit, we need to connect
gates together, the output of one flowing into the input of another. To
do this, we will implement a new class called Connector.
The Connector class will not reside in the gate hierarchy. It will,
however, use the gate hierarchy in that each connector will have two
gates, one on either end (see Figure 12).
This relationship is
very important in object-oriented programming. It is called the HAS-A
Relationship. Recall earlier that we used the phrase “IS-A
Relationship” to say that a child class is related to a parent class,
for example UnaryGate IS-A LogicGate.

Figure 12: A Connector Connects the Output of One Gate to the Input of Another
Now, with the Connector class, we say that a Connector HAS-A
LogicGate meaning that connectors will have instances of the
LogicGate class within them but are not part of the hierarchy. When
designing classes, it is very important to distinguish between those
that have the IS-A relationship (which requires inheritance) and those
that have HAS-A relationships (with no inheritance).
Listing 12 shows the Connector class.
The two gate
instances within each connector object will be referred to as the
fromgate and the togate, recognizing that data values will
“flow” from the output of one gate into an input line of the next. The
call to setNextPin is very important for making connections (see
Listing 13). We need to add this method to our gate classes so
that each togate can choose the proper input line for the
connection.
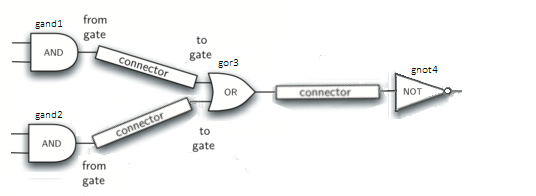
Figure 13: Circit of NOT(AND(ganda,gnadb)OR AND(gandc,gandd))
Self Check Challenge
One of the fundamental building blocks of a computer is something called a flip flop. It’s not something that computer science professors wear on their feet, but rather a kind of circuit that is stable and stores the last piece of data that was put on it. A simple flip-flop can be made from two NOR gates (a combination OR and NOT) that are tied together as in the following diagram. Create a new gate class, called NorGate. NorGates work like OrGates that have a Not attached to the output. See if you can use your new class to implement this.
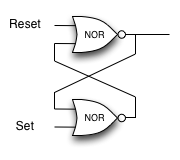
Note if the initial inputs to Reset and Set are both 0 then the output of the flip-flop is 0. But if the Set input is toggled to 1 then the output becomes 1. The great thing is that when the set input goes to 0 the output stays 1, until the reset input is toggled to 1 which resets the output of the circuit back to zero.