Using "Container" Variables
Objectives
- Learn to use "containers" variables in RoboLab
- Learn to use the RoboLab Help features
Tools and Parts Needed
- Constructed 2-wheeled tail-dragger robot
- A touch sensor, embedded in a "bumper"
What are Variables and Containers?
Variables are very important in programming. Variables enable us to store information for future use, and the power of using collected information to direct the running of a program is part of what makes programming so powerful. By using variables, the program becomes more flexible-- instead of having only constants in a program, variables allow the program to store data which might vary from one run to another.
For example, in algebra x is a variable and x = 2 means 2 is assigned to variable x, so in many programming languages, we have a statement such as:
x = 2; // which is called assignment statement because it assigns the value 2 to the variable named x, and the value may change in the program.
Variables in RoboLab
Variables in RoboLab are called containers and are found under the
container icon: 
The default container variable is red, but there are actually three
different colors of general purpose containers: red, blue and yellow:  Each different color represents a different general purpose
container, and the colors are modifiers, so are found in the modifiers
area. Beyond the colors, there are actually 48 generic container
variables.
Each different color represents a different general purpose
container, and the colors are modifiers, so are found in the modifiers
area. Beyond the colors, there are actually 48 generic container
variables.
Containers are the color of the jars whereas the container
value is the value stored in it and is accessed icons as
well: 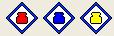
Each container is something called a global variable because it can be used everywhere in the program. A container can hold one value at a time and it can only hold only an integer (whole) number. Therefore, it cannot hold a real or floating point number like 3.14. (Actually, this seems like a more major restriction than it really is.) One thing that may be hard to understand is that, containers always have a value in them, even before you store one, so they must always be initialized or set to an appropriate starting value like 0. (Otherwise, they may have a "garbage" value in them.)
Containers in RoboLab work a bit like the memory on a calculator. To clarify how to use a RoboLab container, you need to understand how to initialize a container, how to store a value in a container, and how to access the value in the container.Choosing the container has a different icon from identifying the container value. For example:
Red container-
Used to indicated which containerRed container value-
Used to access the container value
Here in this assignment statement, the integer value of 2 is stored in red container.
Some examples of using container variables in your program:
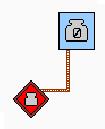
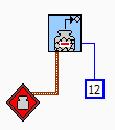
In most programming languages, variables should be initialized (to zero of some other initial value) before one uses them. In RoboLab, the initialization of a container basically sets the value of the container to zero so that the container will function correctly. Any container (Red, Blue or Yellow) should be set to zero value before employing it in your program. In the diagram, the value of a red container is set to zero. Now after initialization, a programmer use the variable to store data or any information by assigning values. In RoboLab, we store data in container by filling it with the data. Here in the diagram, the red container is set to the value of 14. Simple math can be used to store data and change the values that are already stored. There are other mathematical operations like subtraction, division, and addition. So one can use any math and also any whole number value to use with those operations. In the diagram on the right, the number 12 is being subtracted from the red container. Therefore, if this is run after the above command, the value of the red container is now 2. (14 - 12 = 2)
Some examples:


Other useful commands
You will probably
find that the ![]() is a particularly useful icon today's lab. It is used to put a random
number into a container.
is a particularly useful icon today's lab. It is used to put a random
number into a container.
We have seen that it is possible for the robot to wait for an
amount of time: 
We have also see the robot wait for darker, lighter, dark, and light:
 ,
,  ,"
,"
 , and
, and 
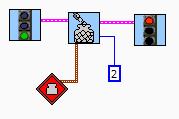
There are other things the robot can be asked to wait for. For
example, we might ask the robot to wait for an amount of time other
than one of the defaults by using the following:

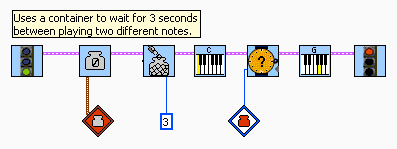
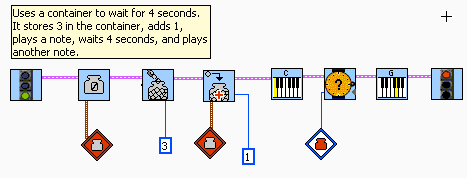
One can use this same icon to ask the robot to wait for the value of a container:

Recall that you can use the LCD display,
 ,
for displaying the light levels. Because this display is a form of
communication, this icon can be found in the communications menu under
the Communications
,
for displaying the light levels. Because this display is a form of
communication, this icon can be found in the communications menu under
the Communications  icon.
icon. In this lab you will create a new Inventor Level 4 program using the touch sensor.
Your Task
- First, use pseudocode to design a program that does the following:
- Makes your robot move forward for a random amount of time
between 1 and 5 seconds and when it stops makes a sound using
 .
(Hint, be sure your random time can be between 1 and 5, not 0
and 8.)
.
(Hint, be sure your random time can be between 1 and 5, not 0
and 8.) - Next, when the touch sensor is pressed, the robot should back up twice as far as it originally traveled forward.
- Insert the SET DISPLAY icon from the RCX communication sub-menu
into your program for both direction of movement. The amount of
time moved should be displayed on the RCX display screen for both
forward and backward movements.
- Next, implement these ideas in RoboLab. To create your own RoboLab
program, open RoboLab in the Programmer: Inventor 4 mode. Name the
program yourusername1-yourusername-L7. Implement
your ideas on your robot by adding any needed sensors and actuators
to your robot, writing this RoboLab program, and trying it on your
robot. Also, be sure to include appropriate comments in your code
such as each team member's name and role. Hint:
You might want to consider using Wait for a very small number of
hundredths of a second icon at one or more points in your
program... Think about why.
- Finally, modify your pseudocode, robot, and RoboLab program to
improve your robot's performance.
- Answer questions in your Lab Report.
Your Lab Report
All lab reports should be self-contained and should contain all of the following information at the top:- The lab number: Lab L7
- How long each person served in each of the roles:
- Programmer/Driver:
- Scribe/Navigator
- Your Pseudocode: Include the final version of your pseudocode in your Lab Report.
- Your Robot: Briefly describe which sensors and actuators need to be attached to which ports for your implementation.
- Your Success: In a paragraph or so, describe how to use your program and whether or not your robot functions as desired. Does the robot travel twice the distance consistently? Does the LCD display work as expected?
- Reflection: Though very simple, the container variable gives the robot the ability to "remember" something. Discuss the importance of this with your partner. Then in your lab report describe a real-world robotic application which you and your partner believe would require a robot to "remember" something, and explain why this memory is important for your real-world application.
- Comments and Suggestions: Write a paragraph that summarizes your team's reaction to RoboLab and to this lab. If there are any problems you encountered or any questions that remain, please ask! Also, be sure to include any suggestions you have for how this lab could be improved.