
Software Design and Implementation
T12: Video Demo
Assignment T12 should be completed in pairs.
Objectives
- Learn how to screen-capture using screen capture software like CamStudio
- Learn to use a video editor like MovieMaker to clip video, add credits and otherwise enhance your video
Video Demo
What we are hoping to create with this teamwork is something like which was created by Berea student, Travis Jones for some software he developed for the senior projects course:
Here is a link to a playlist of the final video demos from last
year's CSC 225 course:
https://www.youtube.com/playlist?list=PLDdBC-S25y3oK9OFlqwS96It3SMBUcnX_
File types
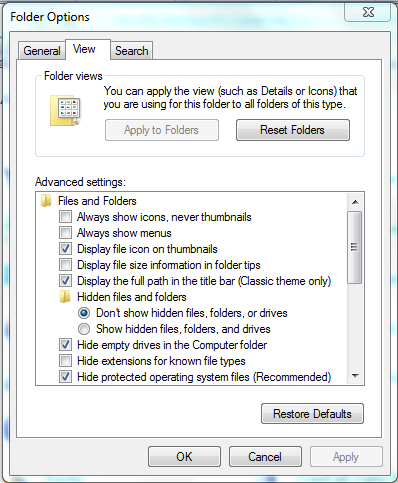
Files are stored on your computer in a large variety of formats, and this is the case for video files as well. It is particularly useful to be able to see what the file types are when you work with video, but the default in Windows is to hide this information. If you cannot currently see the file extensions, please open your Control Panel, select Folder Options, Click on the View option and uncheck the box that says, "Hide extensions for known file types."Software Needed for Screen Capture and Video Editing
I recommend that you plug into an Ethernet cable for these downloads because it will be much faster. Using www.speedtest.net/ from our offices, we got download speeds of 14.65 Mbps Ethernet vs. only 5.35 Mbps on BereaSecure Wifi, so Ethernet was almost three times faster. If all of us in this class use the wifi at the same time to download this software, the performance will be FAR worse.
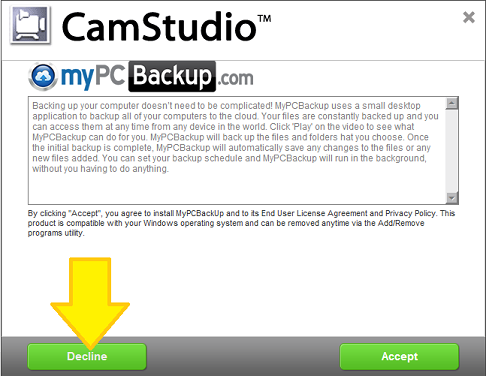
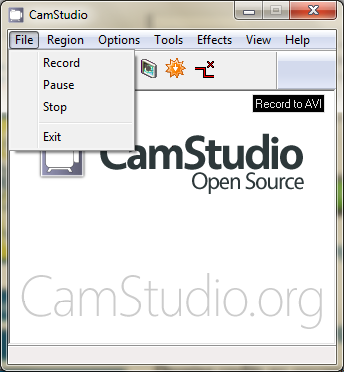
The first piece of software we need to install is for screen capture. I recommend CamStudio which is open-source software which is able to record all screen and audio activity on your computer. Download at: Camtudio.org and then unzip the zip file, and install, being careful to uncheck boxes that offer unneeded software as shown: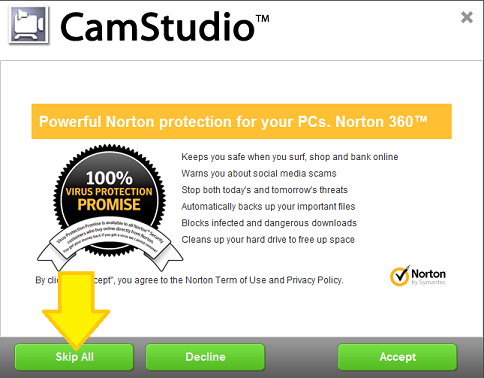
Alternatively, you can use screen capture software which does not require an installation, but the free ones make watermarks. If you have significant trouble with CamStudio for whatever reason, you may use something like https://screencast-o-matic.com/
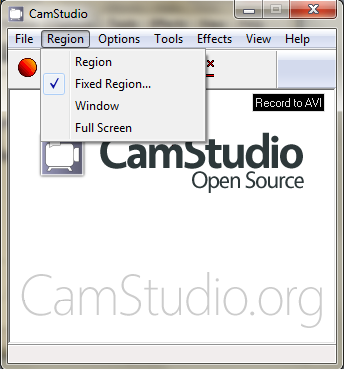
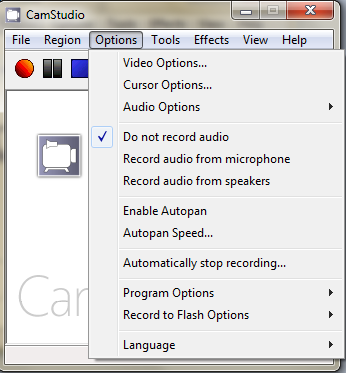
Screen Capture Settings in
CamStudio
Here are a few settings which are important to your successful screen capture:
Video Editing Using Windows Movie Maker
If you are on your college laptop and do not already have a video editing program, I recommend downloading and installing Windows Movie Maker which is free but not installed with the standard College installation. You can use a video editor to do such things as editing the video, adding a title sequence and closing credits. You can download Movie Maker from Windows Live Movie Maker. Note that just as with the screen capture software, you probably do not want all of the extra programs, so install only Movie Maker by choosing select program to install and then un-check the irrelevant boxes:

If you are on a Mac, I recommend iMovie, which should already be installed on your machine since it is part of the standard Mac install.
Using Movie Maker for Editing
To import your video into MovieMaker, click the "Add videos and photos
button" under the Home menu and choose the file you want to import.
You can add multiple videos and then drag and drop clips to rearrange
their sequence. When you have a clip selected, you will see a new
menu, Video Tools, appear up top. Here you will see options to split
your clip, trim it, or change the speed. The Split tool will cut your
clip in two at the point where your cursor is in thestoryboard pane. This is really helpful for dividing up a long clip of footage. You can also add transitions between clips by selecting a clip, then choosing one you
like under the Animations menu. This will add the transition to the beginning of the selected clip.
Opening credits typically list and optionally describing the key people involved in the making of a video. A title sequence precedes a video to present the title of the video. When an video has both a title sequence and opening credits, the opening credits usually appear first, but this is not a firm rule. Closing credits are added at the end of an video to list the developers involved in making the software and the video.
 In Movie Maker, you can add
credits and other text in three ways, all located under the home
menu--note that you can use these in ways of your choosing, not just
for the typical use. For example, a title adds text
onto its own blank background, which is great to use for your opening
title as well as for other things such as memes or quotes you want to
call attention to. If you want your text to be displayed over the top
of the video or photo you have on screen, you want a caption.
For scrolling credits at the end of the video, choose credits.
Whenever you select a frame with text using any of these, youll see a
new menu up top: Text Tools which gives you a bunch of options to
animate your text, change fonts and sizes, etc.
In Movie Maker, you can add
credits and other text in three ways, all located under the home
menu--note that you can use these in ways of your choosing, not just
for the typical use. For example, a title adds text
onto its own blank background, which is great to use for your opening
title as well as for other things such as memes or quotes you want to
call attention to. If you want your text to be displayed over the top
of the video or photo you have on screen, you want a caption.
For scrolling credits at the end of the video, choose credits.
Whenever you select a frame with text using any of these, youll see a
new menu up top: Text Tools which gives you a bunch of options to
animate your text, change fonts and sizes, etc.Windows MovieMaker supports the following input file formats:
- Video files: .asf, .avi, .wmv
- Movie files: MPEG1, .mpeg, .mpg, .m1v, .mp2
- Audio files: .wav, .snd, .au, .aif, .aifc, .aiff,.mp3
- Windows Media files: .asf, .wm, .wma, .wmv
- Still images: .bmp, .jpg, .jpeg, .jpe, .jfif, .gif, .png
After editing your video, you should save your work in two ways. If you want to be able to edit, you need to save as a MovieMaker project, which will be a .wlmp format. These MovieMaker Project formats cannot be posted on any of the video hosting sites. So, you will also need to save your project as a movie file or use the Movie Maker software to publish directly. Note that you will only need to submit the link to your uploaded video.
The instructions
This assignment should be completed in a pair in your team.
You will be creating a video demo of any piece of Python code that you have created. At a minimum, you will be required to do your own screen capture, add a title screen and closing credits. The closing credits must include the names of all members of the team who worked on the video. Make sure you acknowledge all intellectual property created by someone else, including Python, Python code created by an instructor or other classmate, PyCharm, Spyder, MovieMaker, open source music, etc. You must also give yourselves credit for your code and your video production work.
Here is a screen capture and video editing summary:
- Open the Python code you are planning to demo.
- Open CamStudio and set it up to make a screen capture using the appropriate region (window and full screen are typical options.)
- Set the sound appropriately. (Generally recording video and
sound together is a bad idea... If you want narration, do it
afterwards when you are not pushing record and stop.)
- Record and save your file as an avi file called yourusername-T12.avi.
- Open Windows MovieMaker, import yourusername-T12.avi, make edits, and add a title sequence and closing credits.
- Use Windows MovieMaker to optionally add narration and/or open source music.
- From Windows MovieMaker, save your project as yourusername-T12.wlmp so you can edit later.
- Publish to YouTube or other video hosting site, making sure that the video is publicly viewable.
- Open a Microsoft Word document, add your teamname, the names of all teammates who made the video, and the publicly viewable link to your uploaded video.